Remaining Semaphore Signals
Welcome to scot-rail.co.uk, Scotland's online railway community. The group is for any rail enthusiast interested in the railways and trains of Scotland. It not only consists of the wiki that you're reading now, but a busy online forum and mailing list, which was accessible to registered users. From April 2024 the forum has closed, with a replacement started on Groups.io.
Breadcrumb navigation
This page lists the locations of mechanical semaphore signalling on Network Rail Scotland.
As of September 2024 there are 40 Signal boxes and two ground frames that operate signals with semaphore arms:
Annbank Junction G.F., Arbroath, Auchterarder, Aviemore South G.F., Barrhill, Blackford, Blair Atholl, Carmont, Carnoustie, Craigo, Cupar, Dalwhinnie, Dunkeld, Dunragit, Errol, Fort William Junction, Fouldubs Junction, Girvan, Glenwhilly, Greenloaning, Hilton Junction, Holywood, Huntly, Insch, Inverkeilor, Keith, Kennethmont, Kilkerran, Kingussie, Kirkconnel, Laurencekirk, Leuchars, Longannet, Longforgan, Lugton, Mauchline, Montrose North, New Cumnock, Stanley Junction, Stonehaven, Stranraer, Thornhill.
There are also automatic 'Stone Signals' in the Pass of Brander.
Additionally, Stirling North retains some mechanical disc shunting signals.
The signal boxes below are grouped under Line of Route Codes:
As of September 2024 there are 40 Signal boxes and two ground frames that operate signals with semaphore arms:
Annbank Junction G.F., Arbroath, Auchterarder, Aviemore South G.F., Barrhill, Blackford, Blair Atholl, Carmont, Carnoustie, Craigo, Cupar, Dalwhinnie, Dunkeld, Dunragit, Errol, Fort William Junction, Fouldubs Junction, Girvan, Glenwhilly, Greenloaning, Hilton Junction, Holywood, Huntly, Insch, Inverkeilor, Keith, Kennethmont, Kilkerran, Kingussie, Kirkconnel, Laurencekirk, Leuchars, Longannet, Longforgan, Lugton, Mauchline, Montrose North, New Cumnock, Stanley Junction, Stonehaven, Stranraer, Thornhill.
There are also automatic 'Stone Signals' in the Pass of Brander.
Additionally, Stirling North retains some mechanical disc shunting signals.
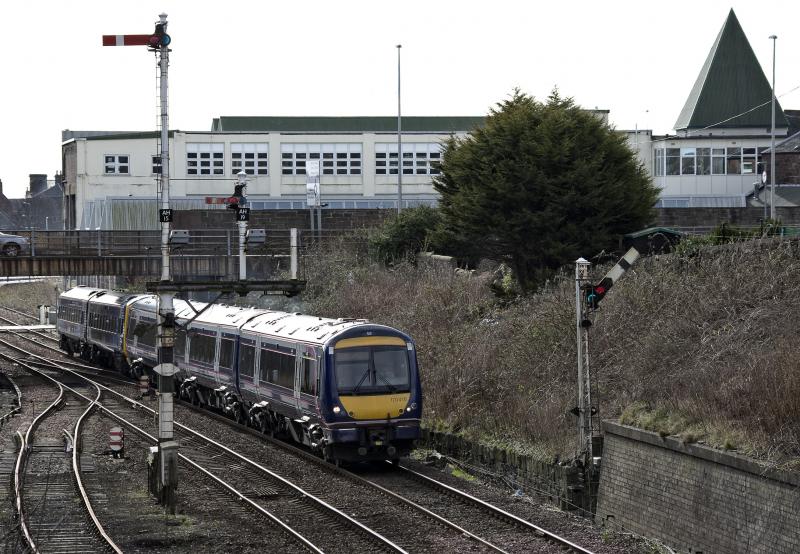
Semaphore signals at Arbroath: Down Starting signal AH45 (with lattice post) is clear for the northbound train. To the right of Up Home signal AH15 is miniature arm AH19 for the Goods sidings. Ground disc signals are provided for other shunting moves. Photo by big55012
- The signals listed below are upper-quadrant stop signals (red arm with vertical white stripe), and on the left side of the track, unless stated.
- 'Mini' denotes a miniature upper-quadrant arm for a shunt class route.
- 'Home' denotes a stop signal on the approach to the Signal box; where there is more than one such signal, the outer home is 'Home 1' and the inner home is 'Home 2'.
- 'Starting' denotes a stop signal (usually) beyond the Signal box, going into the next block section.
- Signal arms are identified by a 2 letter Signal box prefix, plus the number of the lever that operates it.
- SIG1 + SIG2 means two signal arms side-by-side on the same structure and read from the same line.
- SIG1/SIG2 means two signal arms one above the other on the same structure, read from the same line.
The signal boxes below are grouped under Line of Route Codes:
SC031 GRETNA – GLASGOW CENTRAL via KILMARNOCK
Holywood S.B. (4 Semaphore arms)
- Up: HW2 (Home)
- Up: HW3 (Starting) <Photo>
- Down: HW20 (Home) <Photo>
- Down: HW18 (Starting)
- Last wheel worked Level Crossing gates in Scotland.
Thornhill S.B. (5 Semaphore arms)
- Down: TH22 (Home)
- Up: TH8 (Home) Lattice post, next to TH10 <Photo>
- Up: TH10 (Home) Modern post, reads to Up Loop
- Up: TH9 (Starting) Modern post, in-line with TH17
- Up Loop: TH17 (Starting) Modern post <Photo>
- Disc shunt signals (4): TH4/TH5, TH14, TH16
- Up Loop and associated signals commissioned in June 2000.
Kirkconnel S.B. (4 Semaphore arms)
- Up: KC10 (Home) <Photo>
- Up: KC11 (Starting) platform end.
- Down: KC40 (Home) Modern structure from May 2019. <Photo>
- Down: KC39 (Starting)
- Disc shunt signals (6): KC2/KC14, KC16, KC17, KC20, KC37.
New Cumnock S.B. (5 Semaphore arms)
- Down: NC12 (Home 1)
- Down: NC13 (Home 2) on bracket. <Photo>
- Up: NC32 + NC29 (Home 2 + Mini on bracket) Modern structure from 2007. <Photo>
- Up: NC31 (Home 3) Platform end. <Photo>
- Disc shunt signals (7): NC3, NC5/NC8, NC7/NC4, NC19, NC22.
- Up loop exit is elevated double disc NC7/NC4 on a lattice-post <Photo>
- Signal NC30 was co-acting semaphore, replaced by colour light by 2008.
Mauchline S.B. (7 Semaphore arms)
- Down Main: MM7 (Home 1)
- Down Main: MM8 (Home 2) Next to MM23 <Photo>
- Down Main: MM23 (Home 2) With empty bracket. Reads to Up Branch.
- Down Main: MM9 (Starting) Tall post
- Up Branch: MM31 (Starting) in line with MM9 <Photo>
- Down Branch: MM34 (Home) <Photo>
- Down Branch: MM33 (Starting) Reads to up Main. <Photo><Photo>
- Disc shunt signals (5): MM11, MM13, MM22, MM27, MM25.
- Directions reversed on Branch - Up to Annbank & Newton Jn, Ayr (SC087).
Hurlford S.B. (0 Semaphore arms)
- Box Permanently switched out since 2005
- Exit from Barleith Walker's Sidings (now out of use) was semaphore HF9 (Still in situ).
Lugton S.B. (11 Semaphore arms)
- Down Kilmarnock: LU3 (Home)
- Down Kilmarnock: LU19 (Starting)
- Up Kilmarnock (Down): LU8 + LU9 (Home) LU9 on bracket
- Up Kilmarnock (Down): LU17 (Starting)
- Single Line (Up): LU33 + LU28 (Home 1) LU28 on bracket
- Down Kilmarnock (Up): LU24 + LU23 (Home 2) LU24 on bracket <Photo>
- Up Kilmarnock: LU32 (Home 2)
- Up Kilmarnock: LU31 (Starting)
- Disc shunt signals (2): LU10, LU15.
- Motor Operated: LU33
- Signalling alterations dated 28th September 2009.
SC059 GLASGOW CENTRAL – STRANRAER via AYR
Kilkerran S.B. (6 Semaphore arms)
- Down Single: KK2 (Home)
- Down Main: KK3 (Starting) <Photo>
- Up Single: KK16 + KK13 (Home) KK13 on left bracket to Loop <Photo>
- Up Main: KK15 (Starting) on right of track.
- Up Loop: KK12 (Starting) in line with KK15
Girvan S.B. (11 Semaphore arms)
- Down Single: GV4 + GV6 (Home 1) bracket with GV6 on right. Shunt Disc GV7 at foot of post <Photo>, <Photo>.
- Down Main: GV5 (Starting) at end of Platform 2 <Photo>
- Up Main (Down): GV18 (Starting) beyond end of Platform 1, on right of track.<Photo>
- Down Headshunt: GV10/GV11 (Mini/Mini) on right of track. <Photo>
- Up Single: GV27 (Home 1) on right of track <Photo>
- Up Single: GV26/GV21 (Home 2 /Mini) Call-on GV21. Lattice post <Photo>
- Up Main: GV25 + GV15 (Starting + Mini) GV15 on bracket to left, reads to headshunt.
- Goods Yard, Up:
GV24 (Starting) and disc GV14. Line out-of-use, post may be hidden among trees. <Photo> - Disc shunt signals (2)
Barrhill S.B. (4 Semaphore arms)
- Down Single: BR2 (Home)
- Down Loop: BR17 (Starting) <Photo>
- Up Single: BR15 (Home) on right of track
- Up Loop: BR14 (Starting). Tall. <Photo><Photo>
- Disc Shunt signal BR5 Down Loop, Up.
Glenwhilly S.B. (5 Semaphore arms)
- Down Single: GW1 (Distant) <Photo>, <Photo>
- Down Single: GW3 (Home)
- Down Single: GW2 (Starter) <Photo>
- Up Single: GW18 (Home) <Photo>
- Up Loop: GW19 (Starting) <Photo>
- Disc shunt signals (2) GW10, GW8. for Engineers Siding.
- Motor Operated: GW1
Dunragit S.B. (5 Semaphore arms)
- Down Single: DR12 (Home 1) Renewed Jan 2025.
- Down Loop: DR13 (Home 2) <Photo>
- Down Loop: DR14 (Starting) <Photo>
- Up Single: DR27 (Home 1) <Photo>
- Up Loop: DR25 (Starting) Lattice post. <Photo>
Stranraer Harbour S.B. (6 Semaphore arms)
- Down Single: SH10 (Home 1) On right of track <Photo>.
- Down Single: SH11 + SH26 (Home 2) Cantilever structure on right of track <Photo>.
- Up: SH15 (Starting) Platform 1. Lattice post <Photo>.
- Up: SH29 (Starting) Platform 2. Lattice post <Photo>.
- Up Single: SH20 (Starting) <Photo>.
- Various disc shunt signals (14) <Photo>.
SC089 ANNBANK – KILLOCH COLLIERY
Annbank Junction Ground Frame (1 semaphore arm)
SC117 GRANGEMOUTH JN – GRANGEMOUTH
Fouldubs Junction S.B. (3 semaphore arms)
- Down Goods: FD20/FD15 (Home, fixed) + FD15 (Mini, call-on) + Stencil Route Indicator <Photo> Renewed Sep 2018.
- Up, Oil Terminal Line: FD29 (Home) Renewed Sep 2018. <Photo>
- Various disc shunt signals, including 3 tier FD12/FD13/FD14 <Photo>.
- Signalling alterations dated 15 August 2010
- Alterations for electrification, dated 24 September 2018
SC119 GREENHILL UPPER JN – DUNDEE
Stirling North S.B. (0 semaphore arms)
Down Main: SN36 (Home, off platform 2)<Photo>Down Main: SN37 (Starting)- Disc shunt signals (4): SN3 (Down North Siding exit), SN8 (Down Main to Down North Siding), SN31 (Centre Sidings P4&5 exit) & SN44 (Up Main, Down direction) <Photo>
- Changes in October 2018 for electrification.
Dunblane S.B. (0 semaphore arms)
Down Passenger Loop: DB42 (Home 2)<Photo>Down Main: DB45 (Home 2, platform end)<Photo>Down Main: DB44 (Starting)<Photo 1>, <Photo 2>Up Main: DB6 (Home)<Photo 1>, <Photo 2>.Disc shunt signals (1): DB27 (Up Main to Down Main crossover), DB49 (South end of Platform 2) & DB51 (South end of Platform 3)- Signalling alterations dated 25 February 2013
- Changes in October 2018 for electrification.
- Last mechanical signals removed February 2024.
Greenloaning S.B. (5 semaphore arms)
- Down Main: GL5 +
GL9(Home+ Mini on bracket) - Down Main: GL7 (Starting) Lattice post. <Photo>
- Up Main: GL29 +
GL25(Home+ Mini on bracket) - Up Main: GL27/GL27 (Starting, Co-acting arms) <Photo>
- Various disc shunt signals now removed, including yellow discs
GL16(DGL-Down) andGL18(DGL-Up). - All shunt routes are out of use (points removed).
- Until May 2022, Greenloaning S.B. was normally 'switched out' with main signals 'clear'.
- Rationalisation of Signalling in October & November 2022.
Blackford S.B. (3 semaphore arms)
Down Main: BK9 (Home) Lattice post. <Photo>- Down Main: BK11 (Starting) <Photo>
- Up Main: BK24 +
BK20(Home +Miniempty bracket) <Photo 1>, <Photo 2> - Up Main: BK23 (Starting) <Photo>
- Changes in March 2019 for new freight terminal.
Auchterarder S.B. (4 semaphore arms)
- Down Main: AR5 (Home) <Photo>
- Down Main: AR6 (Starting) Lattice post <Photo>
- Up Main: AR14 (Home) Lattice post <Photo>
- Up Main: AR12 (Starting) <Photo>
Up Refuge Siding: AR3- Various disc shunt signals.
Hilton Junction S.B. (4 semaphore arms)
- Up Main: HJ6 + HJ3 (Home) on Gantry, lattice dolls. HJ6 to branch. <Photo>
- Up Branch: HJ7 (Starting) Route SC181 to Ladybank. <Photo>
- Down Branch: HJ12 (Starting) In front of Signalbox. <Photo>
- Motor Operated: HJ7
Barnhill S.B. (0 semaphore arms)
- Down Single:
BH2 (Home)<Photo 1>, <Photo 2> - Down Perth:
BH4 (Starting) - Up Perth:
BH17 (Home) - Up Perth:
BH16 (Starting) Lattice post.<Photo 1>, <Photo 2> - Semaphore Signals removed in December 2022.
Errol S.B. (4 semaphore arms)
- Up Perth: ER8 (Home 1) <Photo>
Up Perth: ER9 (Home 2 Lattice post.Removed November 2019- Up Perth: ER10 (Starting) <Photo>
- Down Perth: ER16 (Home 1) <Photo>
Down Perth: ER15 (Home 2) Platform end.Removed November 2019- Down Perth: ER14 (Starting) <Photo>
Longforgan S.B. (2 semaphore arms)
SC141/SC145 CRAIGENDORAN JN – FORT WILLIAM AND MALLAIG
Fort William Junction S.B. (9 Semaphore arms)
- Down Main FW12 (Home 1) 'End of Radio Token working' from Spean Bridge. <Photo>
- Down Main FW13 (Home 2) Lattice post. <Photo>
- Up Main FW23 (Starting) with disc on bracket reading to Alcan sidings.
- Up Main FW24 + FW27 (Home) FW27 reading to Down Branch. Disc FW22 on low bracket. Modern Structure <Photo>
- Down Branch FW26 Lattice post. Loop exit. <Photo>
- Down Branch FW25 (Starting) Lattice post. 'Start of Radio Token working' <Photo>
- Up Branch FW6 (Home 1) Lattice post, with disc FW2 on Bracket. <Photo> <Photo>
- Up Branch FW7 (Home 2) Lattice post. By signal box <Photo>
- Directions reversed on Branch - Down to Mallaig (SC145).
- Disc ground shunt signals (5) FW1, FW4, FW15, FW16, FW28.
SC143 CRIANLARICH – OBAN
Pass of Brander Automatic Stone Signals (32 Semaphore arms)
- No.1 Down direction arm only
- No.2 to No.16 Up and Down direction arms
- No.17 Up direction arm only
- <More info on www.railsigns.uk>
SC171 HAYMARKET WEST JN – DUNDEE
Cupar S.B. (3 Semaphore arms)
- Down Fife: CP26 (Starting) <Photo>
- Up Fife: CP13 (Home) <Photo>
- Up Fife: CP14 (Starting) <Photo>
- (Shunt signals removed January-March 2018).
Leuchars S.B. (2 Semaphore arms)
Down Fife: LE20 (Home) platform 2<Photo> Removed Feb 2022- Down Fife: LE21 (Starting)
Up Fife: LE30 (Home)<Photo> Removed Feb 2022- Up Fife: LE29 (Starting) platform 1 <Photo>
- Signalling alterations dated 28th February 2022
SC183 STIRLING – CHARLESTOWN JN
Longannet S.B. (8 Semaphore arms)
- Up, Kincardine: LG29 (Home 1)
- Up, Kincardine: LG28 + LG14 (Home 2 + Mini) LG14 on bracket. <Video>
- Up, West Departure: LG17/LG18 (Mini/Mini) On right of track, in line with LG28 <Photo>
- Down, Kincardine: LG3 (Home 2) On right of track <Photo
- Down, Kincardine: LG4 (Starting) On right of track
- Down, East Departure: LG23 (Starting) In line with LG4.
SC191 DUNDEE – ABERDEEN
Carnoustie S.B. (2 Semaphore arms)
Arbroath S.B. (7 Semaphore arms)
- Down: AH48 (Home 1) <Photo>
- Down: AH47 (Home 2) at end of platform <Photo>
- Down: AH45 (Starting) Lattice post. <Photo>
- Up: AH14 (Home 1) <Photo>
- Up: AH15 + AH19 (Home 2 + Mini) AH19 on bracket to right. <Photo>
- Up: AH16 (Starting) Lattice post. End of platform.<Photo>
- Disc shunt signals (15), including 3 tier AH64/AH61/AH62.
- Motor Operated: AH48
Inverkeilor S.B. (4 Semaphore arms)
- Down: IK12 (Home) Lattice post <Photo>
- Down: IK11 (Starting) by over bridge.
- Up: IK6 (Home) <Photo>
- Up: IK7 (Starting) <Photo>
- Disc shunt signals (4): IK18, IK16/IK9. Yellow IK15 in siding. (Siding OOU, to be removed).
Montrose North S.B. (3 Semaphore arms)
- Down Main: MN37 (Home) New in 2013 <Photo>
- Up Main (Down): MN13 (Home) Right side of track, in-line with MN37. New in 2010.
- Down Main: MN36 (Starting)
- Disc shunt signal (1): MN11 for cross-over Down Main to Up Main.
- Major <signalling alterations> dated February 2010.
Craigo S.B. (4 Semaphore arms)
- Down: CO16 (Home) Lattice post, by S.B. <Photo>
- Down: CO16 (Starting)
- Up: CO12 (Home)
- Up: CO14 (Starting) <Photo>
- Disc shunt signals (2) CO4, CO6 for Crossover. (Sidings removed January 2016)
- Craigo S.B. is normally 'switched out' with main signals 'clear'.
Laurencekirk S.B. (6 Semaphore arms)
- Down Main: LK20 (Home 1) Off end of platform <Photo>
- Down Refuge Siding: LK10 (Mini) halfway up tall lattice post of former LK19. <Photo 1>, <Photo 2>
- Down Main: LK18 (Starting) Lattice post.
- Up Main: LK12 (Home) Between S.B. and station. Modern post (after 2009) <Photo>
- Up Main: LK14 (Starting) Crooked post <Photo>, <Photo>
- Disc shunt signals (13) including 3-in-a-row LK28+LK26+LK23 on the Down Refuge Siding. <Photo>
- (LK19 inner home signal, bracket on right of tall post, removed February 2018)
- Motor Operated:LK20
Carmont S.B. (4 Semaphore arms)
Stonehaven S.B. (7 Semaphore arms)
- Down: SV18 (Home 1)
- Down: SV17 (Home 2) Platform end. <Photo>
- Down: SV16 (Starting)
- Up: SV7 (Home 1) Lattice post. <Photo>
- Up: SV8 (Home 2) Lattice post, platform end. <Photo>
- Up: SV9 (Starting) Lattice post.
- Disc shunt signals (3), SV40, SV36 (South end cross-over). Yellow banded SV5 in Up Siding <Photo>.
- Sidings rationalised in 2011.
SC193 PERTH – INVERNESS
Stanley Junction S.B. (3 Semaphore arms)
- Down Main: SJ15 (Starting) <Photo>
- Up Main (Down) SJ16 (Starting) In-line with SJ15.
- Up Single: SJ41 (Home) Tall lattice post <Photo>, <Photo>
Dunkeld S.B. (5 Semaphore arms)
- Down Single: DK21 + DK22 (Home) DK21 on bracket to left for Down Loop <Photo>
- Down Loop: DK20 (Starting) Tall post. <Photo>
- Up Single: DK2 (Home) <Photo>, <Photo>
- Up Main: DK3 (Starting) Tall lattice post <Photo>
- Disc shunt signals (2): DK18, DK12, for up Sidings
Blair Atholl S.B. (4 Semaphore arms)
- Down Single: BA17 (Home) <Photo>
- Down Main: BA16 (Starting) <Photo>
- Up Main: BA6 (Home) <Photo>
- Up Main: BA7 (Starting) Lattice post, BA7 on bracket <Photo>
- Motor Operated: BA6
Dalwhinnie S.B. (5 Semaphore arms)
- Down Main: DW18 +
DW15(Home) DW18 on left bracket,DW15 to Up Main<Photo 1>, <Photo 2> - Down Main: DW17 (Starting) <Photo>
- Up Main (Down): DW7 (Starting) Right side of track, in-line with DW17
- Up Single: DW2 (Home) On bracket. <Photo>
- Up Main: DW3 (Starting) Offset from post. <Photo>
- Disc shunt signals (3):
DW14, DW11/DW12.<Photo> Yellow DW8 in sidings. <Photo> - DW14, DW15 and crossover removed following derailment in 2021.
Kingussie S.B. (6 Semaphore arms)
- Down Single: KG2 (Home) Tall post. <Photo>
- Down Loop: KG3 (Starting) Offset from post <Photo>
- Up Single: KG10 (Home) reads to U&D Loop
- Up Single: KG14 (Home) Left of KG10 <Photo>
- Up Main: KG13 (Starting) <Photo>
- Up Loop: KG4 (Starting) Right side of track, in line with KG13.
- Banner Repeater KG3BR on approach to Down platform.
Aviemore Station South Ground Frame. (2 semaphore arms)
- Down Strathspey Line: No.5A (Home) + No.5B (Mini) <Photo>
- Controlled by private Strathspey Railway.
- There are also semaphore signals North of the station area.
SC195 ABERDEEN – INVERNESS
Insch S.B. (3 Semaphore arms)
Down Single: IH2 (Home)<Photo> (Removed August 2019)- Down Main: IH3 (Starting) <Photo>
- Up Main: IH15 (Home) <Photo>
- Up Main: IH14 (Starting) <Photo>
- Disc shunt signals (2) IH8, IH10 (for Down Refuge Siding) both on short posts.
Kennethmont S.B. (4 Semaphore arms)
- Down Main: KN2 (Home) <Photo 1>, <Photo 2>
- Down Main: KN3 (Starting) <Photo>
- Up Single: KN19 (Home) <Photo>
- Up Main: KN18 (Starting) <Photo>
- Disc shunt signals (4) KN16, KN12 (Down Sidings, both on short posts), KN6, KN8 Up Siding (disconnected)
- LNER type discs with lens at top. <Photo>
Huntly S.B. (8 Semaphore arms)
- Down Single: HT24 + HT22 (Home), HT22 bracket on left to Loop <Photo>
- Down Main: HT23 (Starting) on right of track. <Photo>
- Down Loop: HT21 (Starting)
- Up Single: HT2 + HT4 (Home) HT4 bracket on right to Loop
- Up Main: HT3 (Starting) Cantilever structure. <Photo>
- Up Loop: HT5 (Starting) on right of track.
- Disc shunt signals (4) HT19, HT12, HT11, HT13 (Up Sidings).
Keith Junction S.B. (11 Semaphore arms)
- Down Single: KJ4 + KJ7 (Home), KJ7 bracket on left to Loop <Photo 1>, <Photo 2>
- Down Loop: KJ8 + KJ11 (Starting), KJ11 bracket on left to branch <Photo 1>, <Photo 2>
- Down Main: KJ5 (Starting) On right of track <Photo>
- Down Siding: KJ21 <Photo>
- Up Single: KJ38 + KJ34 (Home) KJ38 bracket on right to Loop <Photo>
- Up Branch: KJ35 (Home)
- Up Main: KJ37 (Starting) <Photo>
- Up Loop: KJ33 (Starting) On right of track.
- Disc shunt signals (7) KJ13/KJ12, KJ23/KJ22, KJ16/KJ27, KJ31 (Down Sidings)